
Since you’re here on my page, I’m going to guess that you spend a lot of your time crafting and working on projects. And so you probably know how important it is to have a dedicated space for doing your craft projects. Not to mention having space to store your craft supplies and keep your materials organized! Well, this DIY craft desk is an easy weekend project that can give you both!
Supply List
- 3 – Closet-Maid 9-Cube Organizer Shelves
- Organizing Cube Bins (Also available in Foldable Cube Bins)
- Band-It Iron On Veneer Edging
- Iron
- Quarter Inch Plywood
- White Melamine Board (4’x8′ sheet)
Note: Affiliate links included within this post for your convenience. As an Amazon Associate, I earn from qualifying purchases.
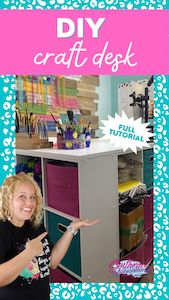
Make this DIY Crafting Desk in a Weekend!
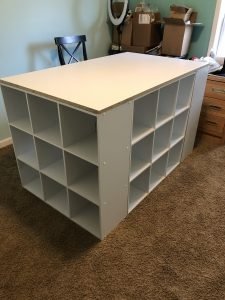
This is the ultimate DIY craft desk! Super affordable and easy for anyone to make! No painting required! It was made using 3 ClosetMaid 9-Cube Organizers from Walmart and 1 (4’x8’) sheet of white Melamine board from Lowes.
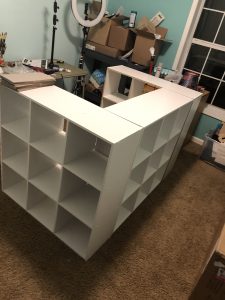
First, assemble the 9-Cube Organizers using instructions provided in the box. Then set them up in a U shape. Measure the width and length you’d need for your table top. Mine is 36”x59”. Use a circular saw to cut your Melamine down to size.
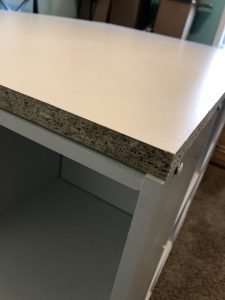
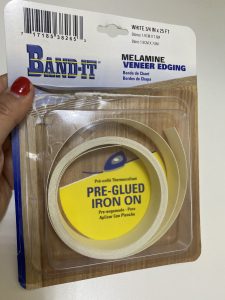
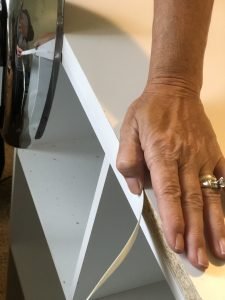
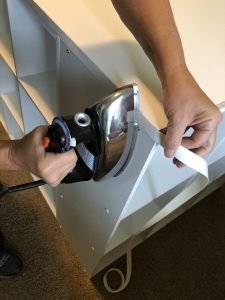
Then seal up the raw edges of the melamine using Melamine Veneer Edging. This activates the glue and seals it to the right edge of the board. We used a hot iron and towel to heat up the edging. The veneer edging not only gives it a more finished look, but it also helps protect against chipping and water damage along the edges.
Finishing the Desk Base
Now you can set your melamine on top of your 9-Cube Organizers. Then using 1 inch screws, attach the table top to the organizer by screwing from the underside of the tabletop. For extra stability, you can also attach the Cube Organizers to each other, but you must do it carefully since you’re not working with real wood, but particle board.
Now for the Cubbies and Shelves!
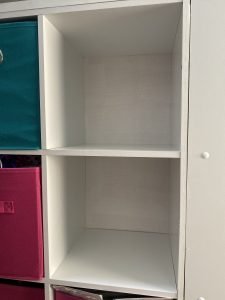
For the interior part of the desk, you can either use the chipboard pieces that come with the organizers or you can do like I did and get a thin sheet of quarter inch plywood and cut it to fit the back of each unit. I painted the plywood white and attached it using small tack nails.
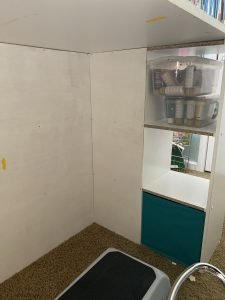
I preferred to have a couple of shelves open on both sides for passing through baskets while sitting at the desk. As you can see, I’ve already gotten paint on the back wall and underside of the desk. Not even sure how that happened! But you never know where all the paint will end up when you’re painting door hangers!
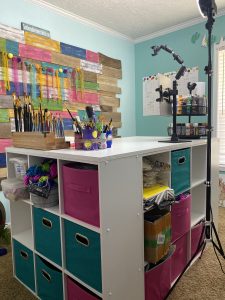
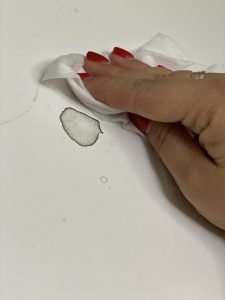
As you can see, I didn’t waste anytime in filling the shelves, bins, and cubbies with my craft supplies! And I have my favorite camera gear ready for filming my facebook live sessions on my new desk. In fact, if you follow me on facebook, you have probably already seen my desk in action in my latest videos! It’s a great space for painting and organizing. And if you make a mess, no big deal! It’s easy to clean lots of smudges and wet paint off with a baby wipe:
Now you have an easy weekend project for the new year! Get yourself organized and get ready to keep painting those door hangers!
Get the Help and Inspiration You Need!
Make sure you follow me on Facebook, Pinterest, and Instagram to get even more ideas, video tutorials, links to my favorite products, and lots of other fun stuff!
Have you signed up for access to my FREE template gallery? Sign up and you’ll get access to download some of my favorite door hanger templates – for free!
And don’t forget about our Painters’ Clubhouse! Once you join, you’ll become part of a monthly membership group where we paint and learn together! From new techniques and painting tips, to getting access to exclusive content all month long, it’s the best place to grow your painting hobby together with us!

I’m going to try to build this island! Love it! Thank you for the inspiration!!
Yeah.. And I am doing it lol. Thanks!
I really like you craft island…I would like to do something similar…I really like the idea of leaving some of the shelving open so as to reach from where you are sitting!
Love this idea! I wonder where the cords for lights, glue guns, etc are located. My work table is in the center of the room and I constantly trip over extension cords!