
Supply List
- Snowman Swirl Frame Door Hanger Template OR Snowman Swirl Frame Blank
- Crystal Gloss Enamels Glitter
- 3D Puffy Paint – White Glitter
- Writer Bottle with Black Paint
DecoArt Americana Paint Colors:
Note: Affiliate links included within this post for your convenience. As an Amazon Associate, I earn from qualifying purchases.

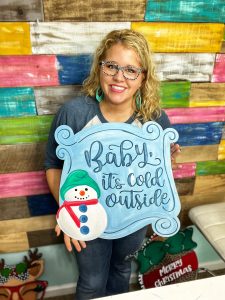
The design we’re painting together today was a best seller the weekend it was released in the shop. It’s so much fun because it has a blue background with fun swirls and snow. I even used a fun iridescent sparkly glitter paint on the snowman! I finished it off with the beautiful lettering, but don’t be afraid of that! If you’re working on our laser etched wood blanks, the lettering is already etched onto the door hanger and when you paint over it you can still see those lines through the paint.
If you’re working with our template, you would print the template at home, tape it together, and make a pattern to trace onto your wood, then cut it out with a jigsaw or scroll saw. Template files from my shop also include a laser cut file if you own a laser machine. If you use a template, you will be tracing the design by hand so before we dive in, I recommend that you go ahead and trace your snowman, then once the snowman and background is painted, you can lay your template down and trace the lettering.
Paint the Background and the Snowman
To paint the background, I used the color Baby Blue. I love it because it’s just a classic blue color. Don’t be afraid to just start laying paint on your door hanger. Get your brush damp and then get started! I added a little bit of white paint to my paint pallet to lighten up the Baby Blue.
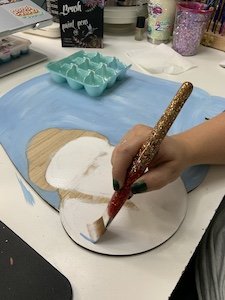
Once the background is painted, I started painting my snowman white. I’m going to add some shading and glitter to him later, but you can paint his entire body and over the etched lines for the time being. Be sure to add a second coat of white so that he is nice and bright!
Add Some Shading
While the second coat of your snowman is still wet, get a teeny amount of blue paint on the corner of your brush and pull it down and around the edges of your snowman. Do this a couple more times until you’re pleased with the shading. If you ever feel like you shaded too much, just dab your brush off with a paper towel, pick up a little more white, and go back over it. It’s super simple!
Paint Some Details
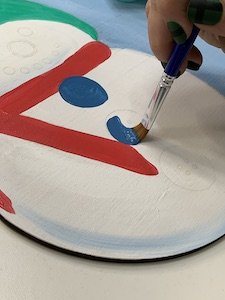
For the next steps, i switched to a smaller flat tip brush, about a half inch wide of so. I am going to use Paradise Green to paint the hat and Watermelon Slice to paint the scarf. Paradise Green can often look a bit transparent once you paint it, so I am going to add a second coat to cover a little better. I recommend rinsing your brush out and drying the first coat so that you aren’t moving the paint around when you go to do another coat. I used the color, Victorian Blue, and a Filbert Tip brush to paint the buttons. Filbert tip just means that instead of being flat at the top, it’s slightly rounder and that helps us to make the rounded shape a little better.
Adding More Details
I used Paradise Green and a bit of Victorian blue to add some shading to my snowman’s hat. Once you’re somewhat happy with your shading, it’s almost best that you just stop or you’ll keep messing with it and end up not liking it. Next, rinse your brush out and pick up a teeny bit of white and add a highlight. To add eyes and a mouth to the snowman, I used a writer bottle with black paint. You could also use a paint pen for this but I wanted them to look like coal and the writer bottle adds some dimension to it.
Painting the Lettering
I switched to a little round tip brush to do my lettering! It helped to make the skinny parts of the lettering go quicker. I also had a wider brush in my other hand so that if I have a wider area of lettering, I can just switch over at any point. I am just following the lines on the wood to paint the lettering!
Add Some Sparkle
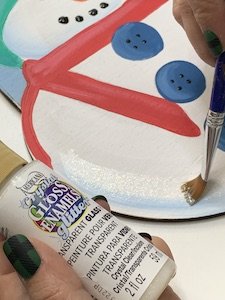
I found this Crystal Gloss Enamel Glitter in my craft closet and I thought it would be so fun to add to the snowman. I know it’s not for wood, but it works on wood! Using a flat tip brush, add some shimmery highlights with the glass paint to your snowman. I even added some shimmery highlights to the lettering as well! Whenever I add these highlights, I just imagine where the light is coming from and add highlights where I think that light would hit the door hanger.
Next, I used some White Glitter puff paint to add some swirls to the background. You could also do these with a paint pen if the little bottle scares you, but the puff paint just looks so fun!
Watch the Replay
I had so much fun painting this door hanger live with you all! If you want to watch the replay for yourself, you can find it below! Tune into my Facebook page every Tuesday and paint live with me. We have so much painting together!
Related Resources
- Like my Facebook Page and watch my Facebook Lives every Tuesday!
- Join my Painter’s Clubhouse Membership and learn more techniques just like this one!
- Subscribe to my YouTube channel!

0 Comments